
As of August 15, 2020

STEP BY STEP GUIDE ON HOW TO APPLY FOR A US TOURIST VISA
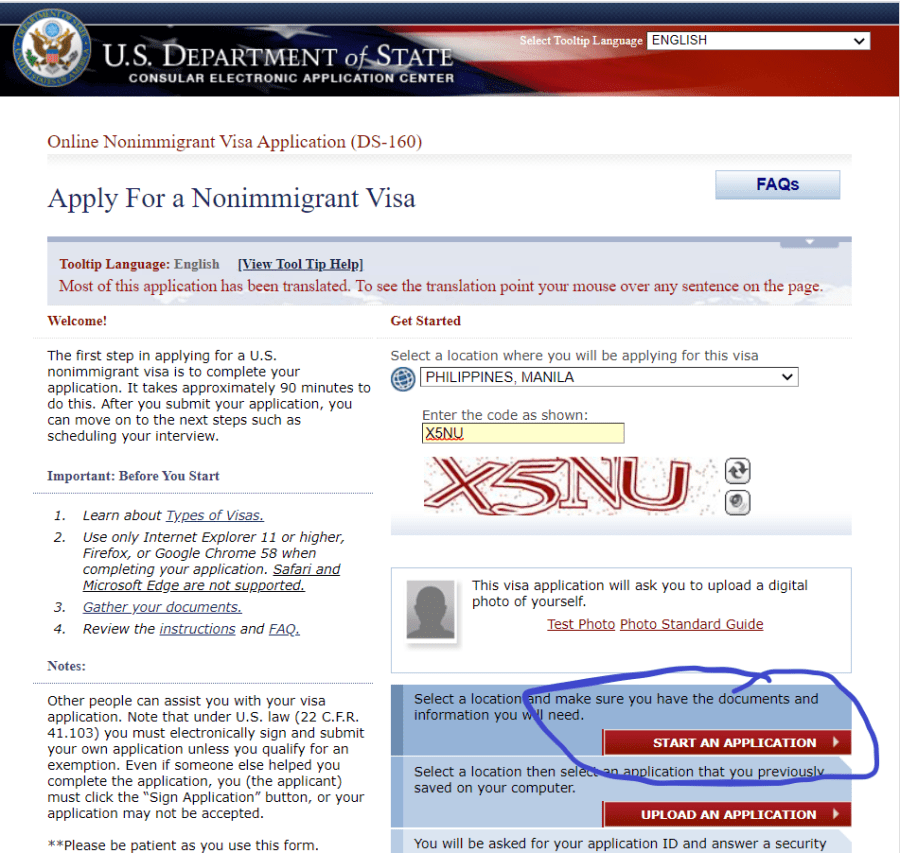
Step 1 – Complete an Online Non-immigrant Visa Application (DS-160) here
-
- First is for you to click “I have read the terms and conditions of the Privacy Act Notice” then you need to set up your security question/answer. Once done, click continue.
- First part is your personal information. You need to answer all required questions. Click next once done.
- The next page to appear is a continuation of your Personal Information. Click next once done.
- The page that appears will ask for your Travel Information. Purpose of trip should be “temporary business pleasure visitor (B)” then choose “B1/B2” under specify. Answer all questions such as intended travel dates, duration, address in the US and who will pay for your trip. This means to say that YOU NEED A SPECIFIC ADDRESS WHERE TO STAY IN THE US. Click next once done.
- The page that appears will ask if who are your travel companion/s are and if you’re joining a group tour. List down all those travelling with you. Once done, click next.
- The page that appears will ask for your previous US travel information. Provide all required information then click next.
- The page that appears will ask about your home address, telephone number/s, email and SOCIAL MEDIA ACCOUNTS. Provide all date needed and do not hide any information regarding your social media accounts. Click next once done.
- The page that appears will ask for your passport details. Click next once done.
- The page that appears will ask for your US contact details. Your US Point of Contact can be any individual in the US who knows you and can verify, if necessary, your identity. If you do not personally know anyone in the US, you may enter the name of the store, company, or organization you plan to visit during your trip. Click next once done.
- The page that appears will ask for your Family details. Provide all required information. Click next once done.
- The page that appears will ask for your work, education and training details. Details about your education, work and training comes in several pages. It will also ask about your travels to other countries within the last 5 years. Click next once done.
- The page that appears will ask security questions and comes in 5 long parts. If you answer “yes” to any of the questions, you need to provide details or circumstances about it. Click next once done.
- The page that appears will ask you to upload your visa photo. Upload one and hopefully the system accepts it. Alternately, you can bring one during your interview. If you upload a photo, click Confirm. If you don’t upload a photo which is perfectly ok, click complete.
- Click Save. You can review and edit your answers. Make sure all entries are correct.
- Last step is sign and submit electronically. Once you do this, you can no longer make any changes in your application. You have successfully completed your DS-160 form.
- You will receive an email confirmation.
- Take note of the 10 digit barcode number of your DS-160 form.
NOTE: Accomplish DS-160 per passport including children
Step 2 – Pay your Visa Fee at any RCBC branch
Starting June 1, 2020, RCBC is the official bank when paying for your US visa application fee. It is no longer BPI. Hence make sure to pay at any RCBC branch. Before going to pay at RCBC, do the following:
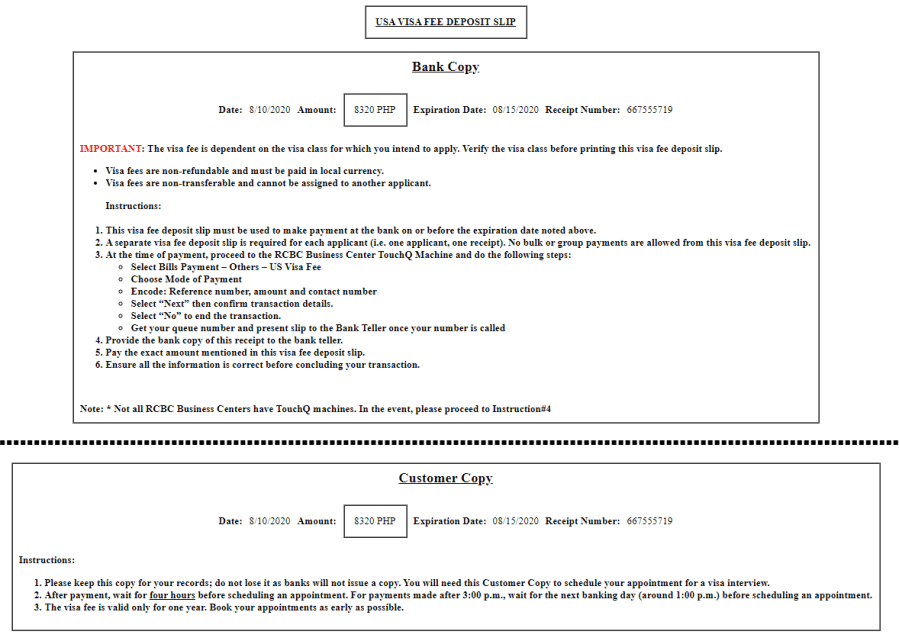
- Generate your receipt here – generate on the day you will pay to be sure it’s a current receipt. Generated receipts have expiration dates, normally 5 days. If you use the receipt after the expiration date, it’s no longer valid. The generated receipt will show the amount you will pay in PHP. Pay what is provided in the receipt. You can check the page of payment information here.
- Print the generated receipt. Do not produce multiple copies of the same receipt to be used by other applicants if you are applying as a family. Every receipt generated online bears a unique receipt number. Every applicant needs a unique receipt number. Say you are 5 in the family applying for a visa, generate 5 receipts – 1 for each.
- Proceed to RCBC and pay. You’ll pay in PHP.
- After paying, keep the receipt provided by RCBC, you need this when making a schedule/appointment for interview with the embassy. The receipt provided by RCBC is non-replaceable. If it’s lost, it can not be replaced.
Step 3 – Create an Online Profile with the US Department of Consular Affairs and Book Your Interview
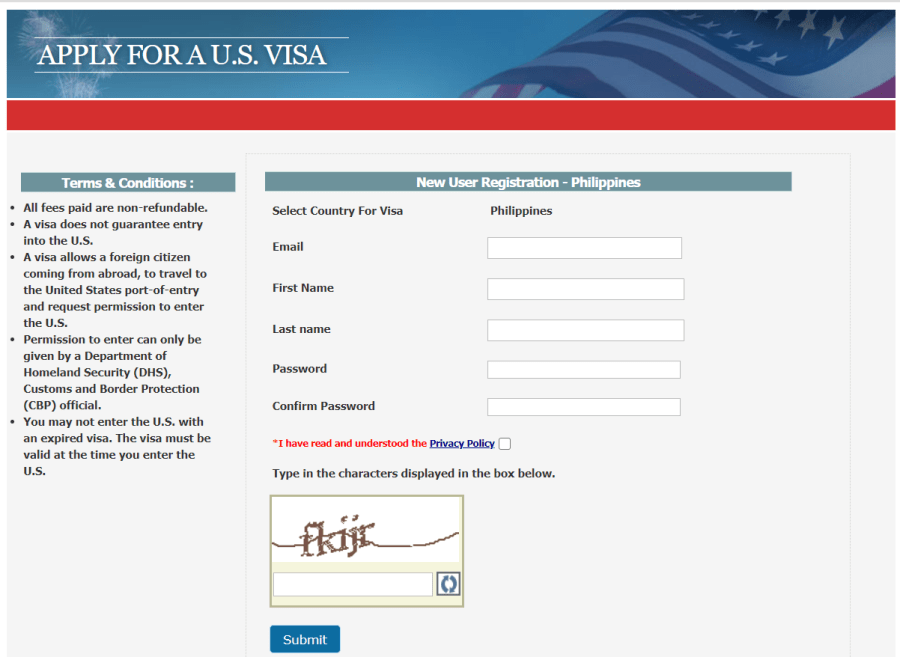
- Provide details for a New User Registration. Once done, click submit.
- The page that appears is your dashboard.
- Select New Application/Schedule an Appointment. Button is located on the left side just below “Home.”
- Select Non-Immigrant. Click continue.
- Select Business/Tourism. Click continue.
- Select B1/B2 – Visitor for business and pleasure. Click continue
- A pop-up will appear. The pop-up is the terms and conditions of your application. Click “I accept terms and conditions.”
- Properly fill-out all details – those with red asterisk. Click continue once done.
- The page that appears will ask for the delivery details of your passport with visa, if granted. Provide all details. Click continue.
- The page that appears will ask you to provide your receipt number. Before you enter the receipt number, ensure that the passport bio data and DS-160 information matches the ustraveldocs profile for all applicants. Discrepancies between the profile, passport information, and DS-160 information may require completion of a new profile and payment of new application fee. Application fees are non-refundable nor transferrable after they are assigned to a particular applicant. Click continue once done.
- You will receive an email confirmation of your interview.
NOTE: In the page where you will enter your receipt number, you can select the date and time of your interview based on the availability as provided by the system. It is located on the lower left part of your dashboard just below Log-Out.
Step 4 – Interview
The day you’ve been waiting for! Take note of the following:
- Arrive 15 minutes before your scheduled time. Do not arrive early or late. You won’t be allowed to entry if you are too early or late.
- Bring the following:
-
-
- printed appointment confirmation with barcode, as emailed
- original current and valid
- old passport/s if it contain/s visa and immigration stamps, forget it if it’s empty
- though not required, just bring the following just in case the consul will ask for it: original bank certificate, passbook, BIR, credit card statement and other proofs of financial capacity such as land titles, card registration, certificate of stocks, time deposit
- ballpen
-
3. Dress smart but don’t over do it.
4. During the interview, answer only what is asked. Do not volunteer information. For example, the Consul asks you, “What’s your favourite color?” Just say red or blue or whichever color. Do not explain why it’s your favorite. Your answers must be clear cut. If yes or no, just say so. Also, avoid using the following words in answering:
-
-
- I don’t think so
- I am not sure
- Perhaps
- I don’t know
- I am not sure
-
- Do not bring cell phone, camera and metallic objets that might be detected by their security machines
- You will learn the result of your interview immediately. If the Consul returns your passport, your visa application is denied.
Step 5 – Wait for your passport to be delivered to your address
If the Consul tells you during the interview that your passport will be delivered to your home address, it’s almost certain that you’re given a visa.
Requirements for US Visa Application
- Passport
- Duly accomplished DS-160 form with barcode
- Though not required, a good travel history is an advantage. This means various visa and immigration stamps in your passport
- Though not required, prepare your financial documents such as bank certificate, original passbook, credit card statements, BIR, employment or business records, land titles, certificates of stocks, vehicle registration and other proofs that you need to go back to the Philippines. Present the same only when asked during the interview
Visa Assistance
Should you need a professional visa consultant to help you secure a US visa, email travel@j8travelservices.com.
As of August 2011
Securing a US Non Immigrant Visa is not difficult at all. I got mine pretty quick and without any hassle. The only requirement I was asked was my passport. At the time of filling, I already have 130 immigration stamps in my new passport acquired in 2010. This perhaps is the reason why I was granted a 10 year multiple entry visa effortlessly. My interview was less than a minute. The consul asked me the following questions:
Consul: What will you do in the States?
Me: Spend the holidays.
Consul: For how long?
Me: A month.
Consul: Do you have relatives there?
Me: I have.
Consul: Who will spend for your trip?
Me: Myself.
Consul: Do you have work?
Me: I do have.
Consul: (checks my passport from page to page and immediately stands and went away from the window and returns after few seconds) Okay sir, you will have your visa in your passport delivered in the address you indicated here.
Me: Thank you and have a good day.
It was quick and I never expected it to be that easy. I have brought with me several documents but he never asked any.
Nonimmigrant Visa Application Procedures (lifted from http://manila.usembassy.gov)
Step 1: Payment of Application Fee
Nonimmigrant visa applicants must pay the machine-readable visa application fee shown on the schedules below. The fee is based on the purpose of the trip or visa category.
| Visa Type | Purpose of Travel | MRV Fee |
| Non-Petition Based Nonimmigrant Visas (except E) | ||
| B-1 | For general business purposes e.g. to participate in business meetings, negotiate a contract, to appear in a court trial | US $140 |
| B-1 | For personal/domestic employees of B, E, F, H, I, J, L, O, P, and Q visa holders and U.S. citizens temporarily assigned to the United States | US $140 |
| B-2 | For general pleasure, visit to friends and relatives, medical treatment, and amateur/unpaid participants in cultural or sports events. | US $140 |
To pay the fee, the applicant must have his or her passport number available. The applicant’s passport number will be tied to the MRV fee paid at the bank. The payment will be activated four hours after the time the cash payment was made; 24 hours for on-line payment.
There are three ways to pay the MRV fee:
- Pay in cash (prevailing Philippine peso equivalent of the machine-readable visa fee) at any branch of the Bank of the Philippine Islands (BPI)
- Pay through online bill payment option provided by BPI for their customers
- Online payment through Bancnet
The following individuals and visa classifications are exempt from paying the machine-readable visa application fee:
- Diplomatic (A1, A2)
- Official (G1, G2, G3, G4)
- Personal Employees of A and G visa holders (A3, G5)
- NATO and NATO-7
- Transit to and from the United Nations Headquarters District (C2)
- Transit of Foreign Government Officials and Immediate Family (C3)
- Applicants for J visas participating in official U.S. government-sponsored educational and cultural exchanges
- Replacement machine-readable visa when the original visa was not properly affixed or needs to be reissued through no fault of the applicant.
A fee applies to only one visa classification/application. If an applicant wishes to apply for more than one visa simultaneously, corresponding payment per visa class must be made.
Visa application fees are non-refundable and non-transferable. No exceptions will be made to this rule. It is valid for one year after the date of actual payment; the interview must fall within the one-year validity.
Step 2: Required Documents
All basic documentary requirements must be ready BEFORE an appointment can be made. Additional documents may be required, so please read the information below carefully.
The Nonimmigrant Visa Unit does not accept documents BEFORE the interview except for Treaty Trader (E1) and Treaty Investor (E2) visa applications. Any documents received will not be returned and will be destroyed (except the passport).
Basic Requirements:
1. DS-160 ONLINE NONIMMIGRANT VISA ELECTRONIC APPLICATION – All applicants must complete the DS-160 Online Nonimmigrant Visa Electronic Application. Applicants can access the DS-160 from the Consular Electronic Application Center website.
In order to avoid delays in processing visa applications, visa applicants or their representatives must ensure that the following information is correctly provided: Applicant’s Complete Name (required format is Surname, First Name(s), Middle Name), Applicant’s Passport Information (the passport used in filling out the form must be the same passport presented on the day of the interview), Other Names (for married female applicants, type your complete maiden name), Purpose of Trip (if the answer falls under “Other,” specify the purpose of travel in the blank provided), Primary Occupation (if the answer falls under “Other,” specify the occupation in the blank provided), Contact Person and Contact Address in the United States, Father’s Complete Name, and Mother’s Complete Maiden Name.
2. PASSPORT – Signed passports must be valid for at least six months from the date of intended departure from the United States. The passport must be in good condition, i.e., photo lamination is undamaged, and all passport pages are intact.
Applicants must also present all previously issued passports or notarized affidavits of loss, if applicable.
Taiwanese passport holders who do not have Taiwan personal identification numbers listed above the date of birth on the biographic data page in their passports must present their original Philippine residency permit.
3. PHOTO
One 2″ x 2″ standard photo. The photo must be:
- In color
- Sized such that the head is between 1 inch and 1 3/8 inches (22 mm and 35 mm) or 50% and 69% of the image’s total height from the bottom of the chin to the top of the head. View the Photo Composition Template for more size requirement details.
- Taken within the last 6 months to reflect your current appearance
- The ears should be exposed, if local or religious custom does not prohibit.
- Taken in front of a plain white or off-white background
- Taken in full-face view directly facing the camera
- With a neutral facial expression and both eyes open
- Taken in clothing that you normally wear on a daily basis
- Uniforms should not be worn in your photo, except religious clothing that is worn daily.
- Do not wear a hat or head covering that obscures the hair or hairline, unless worn daily for a religious purpose. Your full face must be visible, and the head covering must not cast any shadows on your face.
- Headphones, wireless hands-free devices, or similar items are not acceptable in your photo.
- If you normally wear glasses (without tinted lenses), a hearing device, or similar articles, they may be worn in your photo.
- Dark glasses or glasses with tinted lenses are not acceptable.
- Glare on glasses is not acceptable in your photo. Glare can be avoided with a slight downward tilt of the glasses or by removing the glasses or by turning off the camera flash.
Please ensure that your photo meets the requirements stated above. Failure to provide the correct photo will delay your visa processing.
4. EXTENSION OF STAY/CHANGE OF STATUS – Please bring copies of U.S. Citizenship and Immigration Services (USCIS) approvals of extension of stay or change of status, if applicable.
5. PROOF OF RELATIONSHIP (if applying with/for dependent/s)
- Original marriage certificate printed on Philippine National Statistics Office security paper, if applicable (if applying with a spouse and/or child)
- Original birth certificate printed on Philippine National Statistics Office security paper (for dependent/s)
Step 3 : Schedule an Interview
Book an appointment by calling (02) 982-5555 and (02) 902-8930 for calls within the Philippines and other countries aside from mainland United States or (214) 571-1600 for calls from mainland United States. The call center is open from 8:00 a.m. to 8:00 p.m., Monday through Friday, Manila time, except on U.S. and Philippine holidays. Appointments can also be booked online through http://www.ustraveldocs.com/ph.
Five or more applicants applying for the same purpose of travel strictly under the B1/B2 classification, and will travel on the same date, are encouraged to apply together as a group. To request a Group Appointment, follow the steps in our Group Appointment website. Examples of groups include but are not limited to sports team, school groups, groups travelling for competitions, and service organizations. Family members traveling together do not qualify for group appointments.
Applicants who will book an interview online will be asked to create a profile which will be used to access their appointment record and edit applicant information before their interview date.
The call center and the online appointment website can also provide general information about visa application procedures and technical assistance related to scheduling an appointment.
Step 4: Go for the Interview
All applicants must appear at the Embassy for interview, except government officials traveling on official business and applying for A1, A2, G1, G2, or G4 visas. Applicants are requested to arrive at the Embassy gate 15 minutes before the time listed on the appointment letter.
Applicants must bring all the basic application requirements including the interview appointment letter, DS-160 confirmation page, valid passport, one 2” x 2” photo, and all prior passports and U.S. visas, if available. It is helpful to bring a government-recognized photo ID (in addition to the passport) to present upon entry.
Embassy personnel are available to provide assistance at each stage. Applicants who require interpreters must inform the interviewing officer on the day of their interview. There is no need to bring a relative or a friend to act as an interpreter as the Embassy can provide language assistance when an applicant requests for it.
Important note: American citizens and US Legal Permanent Residents are not allowed to accompany nonimmigrant visa applicants to the interviewing area.
Step 5: If Issued a visa
A consular officer will inform the applicant at the conclusion of the interview whether he/she qualifies for a U.S. visa. If a visa is approved, the passport with U.S. visa will be delivered by the courier service at the address provided when the made the appointment. If the applicant is not present at the time of the delivery of the passport, the applicant must leave an authorization letter to a representative and a government-recognized photo ID for both representative and applicant. Both the applicant and the representative must sign the authorization letter.


Sometimes it is the common things that trip you up. For instance, I appreciated this reminder: “Applicants are requested to arrive at the Embassy gate 15 minutes before the time listed on the appointment letter.” Thank you for EVERYTHING regarding visas you’ve helped out with on your good website!
LikeLike
You have gone into great detail in showing us how to get the non-immigrant US visa.
Thank you very much, and I’m glad your interview with the consul lasted only 1 minute(!)
LikeLike
Hello!
What are the options for contact person and contact address in the US? If I put a relative would they require a proof?
Thanks in advance!
xx
lala
LikeLike
yup. 2x
LikeLike
Hello Author, I would just like to ask because I’ve noticed that your US visa has some ink smudges from the passport stamps on the opposite page. Some of the ink even went to your visa face photo. does this not cause any troubles when you went to US? I mean, from the boarding, to the immigration kiosk and to the CBP officer?
LikeLike
Hi Question,
have you travelled yet to US after you got your US visa.
LikeLike
Good day very cool site!! Man .. Beautiful
.. Amazing .. I will bookmark your web site and take the feeds
also? I’m satisfied to search out so many useful information right here in the
put up, we’d like develop more strategies in this regard, thanks for sharing.
. . . . .
LikeLike
Hi, so youre middle name is located in your given name right? Im confused cos mine is like that..
LikeLike
yup
LikeLike
A high number is a good indicator that your niche is profitable, but on the other hand,
if you know for sure that a niche is profitable
(like home theater systems, which sell for quite a lot of money),
low bid prices can mean that this is a market that
is ripe for domination. Mountain bike tires are also larger and more heavy duty.
I sit in gratitude everyday for all those that I meet, and have
become friends with, for those I have taught and who have teach
me everyday in every way.
LikeLike
Hi there very nice web site!! Man .. Excellent ..
Amazing .. I will bookmark your blog and take the feeds additionally?
I am happy to find a lot of helpful information here within the publish,
we’d like develop extra techniques in this regard, thanks for sharing.
. . . . .
LikeLike
What’s up, all the time i used to check weblog posts
here in the early hours in the morning, as i enjoy to learn more and more.
LikeLike
Thank you for helping out, outstanding information.
LikeLike
Wow I enjoy reading your articles, saved to favorites!
LikeLike
Someone necessarily assist to make seriously posts I’d
state. That is the first time I frequented your website page and thus far?
I amazed with the analysis you made to create this particular post extraordinary.
Excellent process!
LikeLike
Howdy! This is my first comment here so I just wanted to give a quick shout out and say I genuinely
enjoy reading through your posts. Can you suggest any other blogs/websites/forums that deal with the same subjects?
Thank you!
LikeLike
thanks
LikeLike
This is really interesting, You are a very professional blogger.
I have joined your rss feed and look ahead to seeking more of
your excellent post. Also, I have shared your web site in my social networks
LikeLike